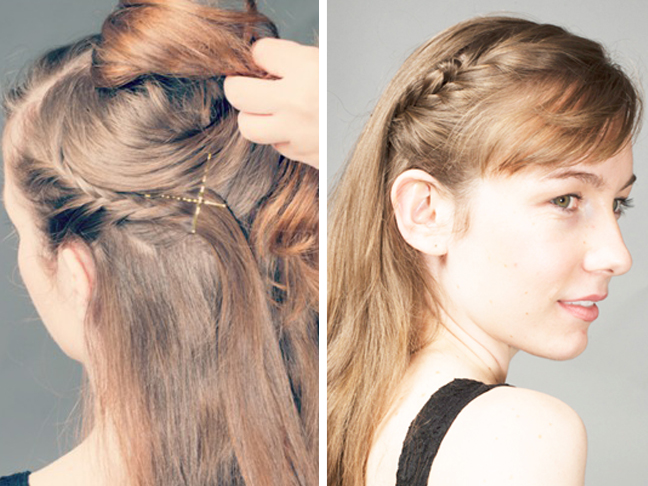
Jetting off to your next holiday party just got easier with this ultra simple, statement-making holiday hair tutorial. Perfect for the girl-on-the-go, this quick and easy tuck braid headband tutorial can get you out the door in a hurry.
Creating this tuck braid headband provides quickly groomed hair that’s away from your face and way cuter than simply tucking your hair behind your ears. (Plus, this is a great style tip for bangs or layers that are being grown out.)
Why it’s great for the holidays & more:
- It’s easy to do just about anywhere
- It’s simple and pretty—the simplest styles sometimes attract the most eyes
- It’s fantastic for any type of holiday soiree
- It’s quick
- It gets you out of a hair rut
- It turns a bad hair day into something polished and presentable
- It lasts all day
- It gets your hair out of your face
Supplies:
- Two small rubber bands
- Large hair clip
- Four hair pins
- Holding hairspray
Instructions:
Step 1: Lift up your crown and secure with a clip.
Step 2: Take a small section of hair on both sides of your head. (Usually the amount of hair that lies in front of and on top of each ear is best.)
Step 3: Start creating a french braid near the scalp, and then continue braiding until you’ve reached about halfway down the parted section.
Step 4: Secure with a rubber band or use a hair clamp to hold braid in place. (The need to use a rubber band depends on the thickness of your hair.)
Step 5: Tuck the braid underneath your hair that’s being held in the large clip. Hold your side braid in place by criss-crossing two hair pins together. The weight of your loose hair in the back will disguise the pins when you let it loose.
Step 6: Repeat on the other side.
Step 7: Spray both sides in place with firm holding hairspray.
Hair by Maritza Buelvas of Beauty For Bloggers
Photography by Will Walker of Will Walker Studios
Modeling by Karolina O.
More Holiday Hair Ideas:
