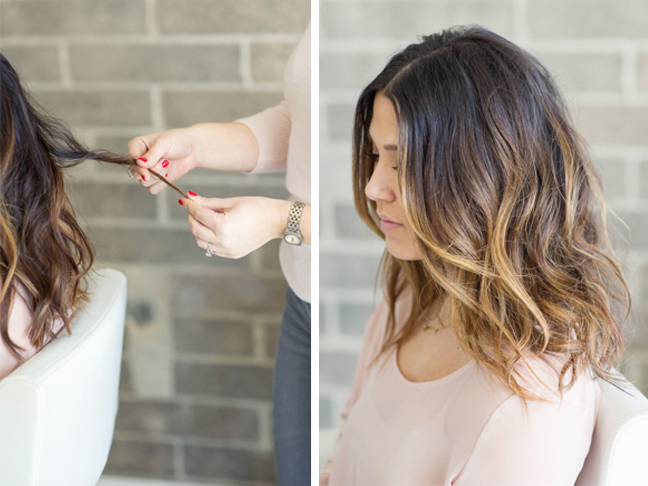
The “lob” or long bob is the hottest trend hitting runways, magazines, and the streets this year. More importantly, it’s a super-low maintenance style. You can let it grow out for a while before going in to the salon for a cut, and it still looks great (unlike bobs, which are harder to maintain). It’s fresh and sassy, yet still beyond practical. It’s perfect in every version, too. You can wear it in a shorter version that hits just above the shoulders or a little longer below the shoulders. The anatomy of this fresh cut is blended edges and layers that make for the perfect “cool girl” haircut. Whether you decide to wear your lob straight or in a messy, textured look, you can’t go wrong.
Below are the tips and tricks from the pros on how to style a lob with a sexy, piecey look. And check out this slideshow with fifteen awesome lob styling inspirations, too.
Supplies:
- Heat resistant spray — Kenra Thermal Spray, $14.23, is amazing.
- Dry shampoo — I love Oribe Texturizing Spray, $39.
- Hairspray — Kenra Volumizing Spray, $15.08, works so well.
- Curling iron or curling wand from Hot Tools, with 1½ inch barrel, $30.95
- Curling iron or curling wand from Hot Tools, with 2 inch barrel, $35.95
Instructions:
Step 1: Prep hair with heat resistant spray, dry shampoo, and hairspray all over and into hair. If hair is freshly washed, I like to use a hair wax over each section to help dirty hair and give everything grit. Then section off to begin curling.
RELATED: 9 Gorgeous, No-Heat Hairstyle Hacks
Step 2: In 2 inch sections, wrap hair around a 1½ inch curling iron, leaving ends out. You can also use a wand-style curling iron.
Step 3: Continue up hair, breaking into sections and working upward. Continue adding dry shampoo at roots before curling.
Step 4: Every other hair section, switch from the 1½ inch iron to the 2 inch iron for added texture and movement. Curl in the same style, wrapping hair around the iron and leaving the ends out.
Step 5: Again, alternating irons and directions, mix up the curls to create interest. The idea is to create an imperfect, carefree look.
Step 6: Once all of your hair is curled, use your hands to shake out your hair to break up and blend the curls.
Step 7: Muss up hair using some more wax by scrunching with hands and breaking up small sections and twirling them around your fingers for definition.
Step 8: To add even more of a “lived in ” feel…take small sections and wrap each section around your finger. Holding your hair at the bottom, pull hair toward your head to create a slightly tangled look and help create volume in the back.
Voila! The beauty of this look is that the longer you wear it the better and more lived in the style looks. This cut is perfect for all face shapes and is easily pulled back into a messy pony.
More Hair Tutorials:
- The Hottest Hair Trends of 2015 & How You Can Pull Them Off
- 7 Hottest Hairstyles for 2016 (& 5 Hair Trends That Died with 2015)
- 17 Brilliant Beauty Travel Hacks & Products to Streamline Your Trip
15 lob hairstyles
-
Ombre Lob
We love the shoulderlength, ombre bob on With Kendra.Just the tiniest wave can go a long way.
Photo: With Kendra
-
Short Lob
Lucy Hale's just-above shoulder length lob looks textured, piecy, and perfect.
Photo: Getty
-
Lob With Bangs
Spice up your lob with sexy bangs that sweep off to the side and long, tousled waves.
Photo: Getty
-
Long Lob
This long lob has the perfect combination of waves and highlights for a light, layered look.
Photo: Instagram/hair_by_jessie_g
-
Straight Lob
This pin-straight, long lob is blunt, modern, and edgy.
Photo: Instagram/Chris Weber Hair
-
Layered Lob
Break up the monotony of a blunt shoulder length lob with layers and waves for added volume.
Photo: Instagram/Cece Looks
-
Modern Lob
This straight shoulder length lob looks both playful and refined, thanks to the side part and funky rainbow ombre color.
Photo: Instagram/Chris Weber Hair
-
Sleek Lob
This straight-out-of-the-salon look is easy enough with a blow out and some sexy tousled chunks.
Photo: Pikore/Maria Yousif
-
Chunky Lob
Thick, chunky waves give this lob an unkempt, yet effortlessly put together look.
Photo: Instagram/Che.r.Mariano
-
Colorful Lob
Looking for a fun way to jazz up your lob? Go bright, bold, and colorful.
Photo: Instagram/Mermaidians
-
Curly Lob
A great juxtaposition is styling a straight lob with some gorgeous, beyond-wavy curls to add depth and movement.
Photo: Instagram/Hair by ash paul
-
Thick Lob
Thick hair can handle a lob, too. Go for a layered, piecey look.
Photo: Instagram/Studio Harfager
-
Choppy Lob
The choppy lob on Kristen Bell is face flattering, fun, and super easy to maintain.
Photo: Getty
-
Side-Part Lob
Jenna Dewan Tatum's simple yet sophisticated (and awesomely black!) lob is amped up with a cool side part.
Photo: Getty
-
15 lob hairstyles #15
Emma Stone's shoulder length lob has a slight wave that gives it a playful yet sophisticated edge.
Photo: Getty
