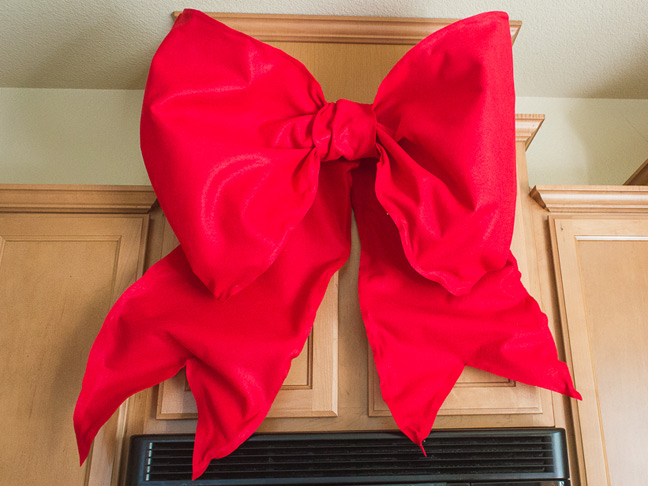
Our family loves the holiday season and loves being surrounded by the smell of pine trees, never-ending garlands, and ornaments galore! It’s totally why we absolutely love visiting the Disney Parks during the holiday season—every inch of every park is dressed in the holiday spirit! It’s not hard to immerse yourself in the holiday spirit when you take photos by the giant Christmas tree on Main Street, U.S.A. and munch on oversized gingerbread man cookies. Unfortunately, we can’t visit the Disney Parks every day of the holiday season, so instead we like to bring a little bit of it back home.
In the Disney Parks, no surface is left untouched, as garlands and bows adorn everything the eye can see! We bring the same magic to our house by making our own oversized bows to decorate the windows and overhangs in our house. You can create an oversized felt bow in any color or create a shiny and sparkly bow out of deco mesh. All you really need is the material and some wire and you’re ready to go!
Here’s how to decorate your home for the holidays with Disney-style giant bows.
FELT BOW
Supplies:
- 2 pieces of felt – 72″ wide x 24″ long
- hot glue gun & glue
- galvanized steel wire – 18 gauge (50 ft+)
- scissors & wire cutters
Instructions:
Bow
Step 1: Fold one of the pieces of felt accordion-style into fourths.
Step 2: Measure 6″ from each edge of the “open” end of the folded felt. Draw two lines connecting the corners of the folded end to the 6″ marks. Cut through all four layers using those lines.
Step 3: Unfold the felt and begin measuring enough wire to glue to the top and bottom edges of this piece of the bow. Once you’ve cut the wire, attach it using hot glue.
Step 4: To make the top of your bow, fold one of the ends of the felt back to meet in the middle so that the wire is in the inside of the bow. Secure it with hot glue. Repeat with the other end of the felt.
Bow Tails
Step 5: Fold the other piece of felt in half so that your felt measures 36″ x 24″. Using one of the long edges on one edge of the ribbon tails, use a ruler to draw a tail that is 9″ long at the top and extends out 16″ at its widest point. Cut through both layers using that line.
Step 6: Measure enough wire to glue to all but the top edge of the bow tails. Once you’ve cut the wire, attach it using hot glue.
Step 7: Cut a 5″ x 12″ piece of felt from the remaining scraps. Scrunch your bow tightly in the middle and then wrap this piece around the center of the bow and hot glue it to secure.
Step 8: Attach the bow and bow tails together with hot glue. Use an extra piece of wire to create a loop hanger through the center piece. Fluff out your bow using the wire to bend it as you like, and hang your bow prominently in the house.
DECO MESH BOW
Supplies:
- 1 roll of deco mesh – 21″ x 10 yards
- galvanized steel wire – 18 gauge
- scissors & wire cutters
Instructions:
Step 1: Unroll your deco mesh completely from the spool. Cut off a 12″ piece from one end and put to the side.
Step 2: Fold the deco mesh in half back in on itself. Cut two pieces of wire 10 yards longs.
Step 3: Starting at one end and at the top of the deco mesh, weave the wire in and out of the two layers of mesh every 2 to 3 inches until you’ve reached the other end. Repeat with the second piece of wire and then weave it into the bottom end of the deco mesh. Fold the wire ends back in on themselves to secure them. Cut one final 21″ piece of wire to weave the open end of the ribbon together.
Step 4: Lay out the ribbon in a straight line and then fold both ends back toward the center. You will want the back piece of the ribbon to be about 6 feet wide.
Step 5: Use your spare 12″ piece of deco mesh to secure the middle of the ribbon and tie it tightly in a knot.
Step 6: Use an extra piece of wire to create a loop hanger through the center piece. Fluff out your bow using the wire to bend it as you like, and hang your bow prominently in the house.
This post was sponsored by Disney.
